QMK
What's QMK?
QMK is a series of open source firmware for keyboard. Besides firmware, it also provides many useful tools for configuring your keyboard, such as QMK Configurator, QMK toolbox, etc.
Installation
To install QMK on Mac(Intel), you can just use brew install qmk/qmk/qmk. But for M1 Macs, this installation might fail. Here is the reference for installing QMK through rosetta2: https://www.reddit.com/r/olkb/comments/nh2fk9/guide_installing_qmk_on_m1_macbook/
After installation, you should use qmk setup to set your QMK configuration. Then, you can use QMK to build firmware for your keyboard!
Build your first firmware
We can start from build a default keymap for your keyboard. To build the firmware with default keymap, you can use
|
|
This requires your keyboard is supported officially by QMK. If not, you can create a PR to add your keyboard to QMK repo.
If you see the message like following, your firmware is sucessfully built:
Linking: .build/clueboard_66_rev3_default.elf                                                       [OK]
Creating load file for flashing: .build/clueboard_66_rev3_default.hex                               [OK]
Copying clueboard_66_rev3_default.hex to qmk_firmware folder                                        [OK]
Checking file size of clueboard_66_rev3_default.hex                                                 [OK]
 * The firmware size is fine - 26356/28672 (2316 bytes free)
Create your first firmware
In the last section, we just created a firmware for clueboard_66_rev3 with default keymap. Now we'll create a new keyboard and build the firmware with a customized keymap.
Create a new keyboard
First of all, you can create your own qmk keyboard using
|
|
Then you'll asked to choose your keyboard's name, layout and MCU. Keyboard naming supports at most 4 folder levels, the generated keyboard folder will be placed under keyboards folder:
|
|
If a sub-folder has rules.mk, it will be considered as a keyboard. The keyboard folder has the following files
-
readme.md
readme.mdis needed in QMK configurator for basic information about this keyboard -
info.json
info.jsonis used by QMK API, it contains the information and metadata about this keyboard. Here is the reference aboutinfo.json -
config.h
config.hsets important hardware informations about the keyboard, such as matrix size, product name, USB VID/PID, etc. This file is required for all keyboards firmware. For most cases, information inconfig.hshould be consist withinfo.json -
rules.mk
rules.mkmeans that this folder is a keyboard target and you can runmakecommand here. In this file, you can write the default configuration of your keyboard and enable QWK features. -
<keyboard_name>.c
You can write your own code here. There are some functions that you can write:
void matrix_init_kb(void)void matrix_scan_kb(void)bool process_record_kb(uint16_t keycode, keyrecord_t *record)void led_set_kb(uint8_t usb_led)
-
<keyboard_name>.h
You'll define the matrix for your keyboard and other variables which will be used in
<keyboard_name>.chere
Create a new keymap
After creating your keyboard, you can create a new keymap for your keyboard using
|
|
Then, a keymap.c file will be created at the keyboard folder. You can edit this file to customize your keymap as you want.
Edit your keymap
Open keymap.c using your favorite IDE/text editor, edit the file as you want. There are some keycodes reference here:
Remember to save your keymap after you edit it.
Build your firmware
After you edit your keymap, you can use qmk compile command to complie your firmware:
|
|
If you see the output like:
Linking: .build/lockr_fancer_default.elf                                                            [OK]
Creating binary load file for flashing: .build/lockr_fancer_default.bin                             [OK]
Creating load file for flashing: .build/lockr_fancer_default.hex                                    [OK]

Size after:
   text	   data	    bss	    dec	    hex	filename
      0	  23028	      0	  23028	   59f4	lockr_fancer_default.bin

Copying lockr_fancer_default.bin to qmk_firmware folder                                             [OK]
Congraduations! You've done with your first customized keyboard and keymap using QMK.
Flash your keyboard
The last thing you need to do is to flash the firmware to your keyboard. There are some steps to flash the firmware:
-
Put your keyboard into DFU mode
It depends on the specific hardware and firmware. You can try the steps to enable DFU mode here.
-
Flash your firmware using QMK toolbox
This is the simplest way if you've successfully enable DFU mode and QMK toolbox recognizes it. Simply load the .hex or .bin file you just compiled in QMK toolbox and click the Flash button in QMK toolbox. If you see the following output:
*** DFU device connected: Atmel Corp. ATmega32U4 (03EB:2FF4:0000)
*** Attempting to flash, please don't remove device
>>> dfu-programmer.exe atmega32u4 erase --force
    Erasing flash...  Success
    Checking memory from 0x0 to 0x6FFF...  Empty.
>>> dfu-programmer.exe atmega32u4 flash "D:\Git\qmk_firmware\gh60_satan_default.hex"
    Checking memory from 0x0 to 0x3F7F...  Empty.
    0%                            100%  Programming 0x3F80 bytes...
    [>>>>>>>>>>>>>>>>>>>>>>>>>>>>>>>>]  Success
    0%                            100%  Reading 0x7000 bytes...
    [>>>>>>>>>>>>>>>>>>>>>>>>>>>>>>>>]  Success
    Validating...  Success
    0x3F80 bytes written into 0x7000 bytes memory (56.70%).
>>> dfu-programmer.exe atmega32u4 reset

*** DFU device disconnected: Atmel Corp: ATmega32U4 (03EB:2FF4:0000)
All things are done! Then test your keyboard.
-
(optional) Flash your keyboard from CLI
You can also flash your keyboard from QMK cli tool, this is also quite simple:
1qmk flash
Flash STM32
For most stm32 series MCUs, you have to enable DFU mode and then flash it. If you have a brand new stm32, you can enable DFU first using a hardware-way. STM32 series has three booting strategies, see the following table:
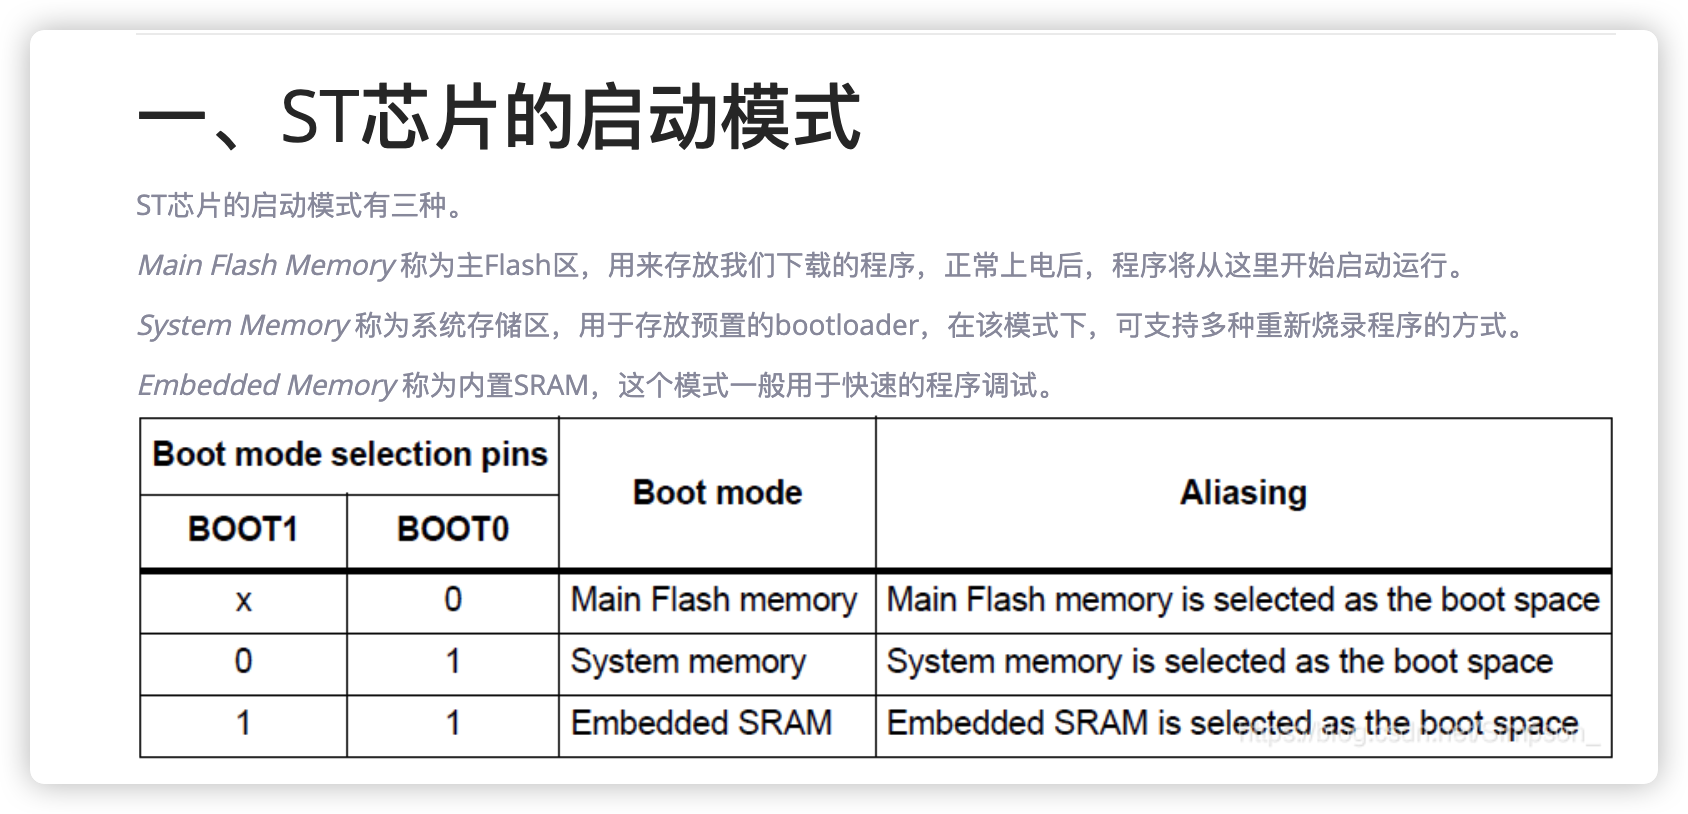
STM32 has a default bootloader in system memory, with enabling DFU mode. What you need to do is setting BOOT0 pin to 1, and BOOT1 pin to 0, reset the chip. Then open QMK toolbox to flash your firmware or using
qmk flash
command. If you see
in QMK toolbox or the following output in your terminal:
Opening DFU capable USB device...
Device ID 0483:df11
Device DFU version 011a
Claiming USB DFU Interface...
Setting Alternate Interface #0 ...
Determining device status...
DFU state(10) = dfuERROR, status(10) = Device's firmware is corrupt. It cannot return to run-time (non-DFU) operations
Clearing status
Determining device status...
DFU state(2) = dfuIDLE, status(0) = No error condition is present
DFU mode device DFU version 011a
Device returned transfer size 2048
DfuSe interface name: "Internal Flash "
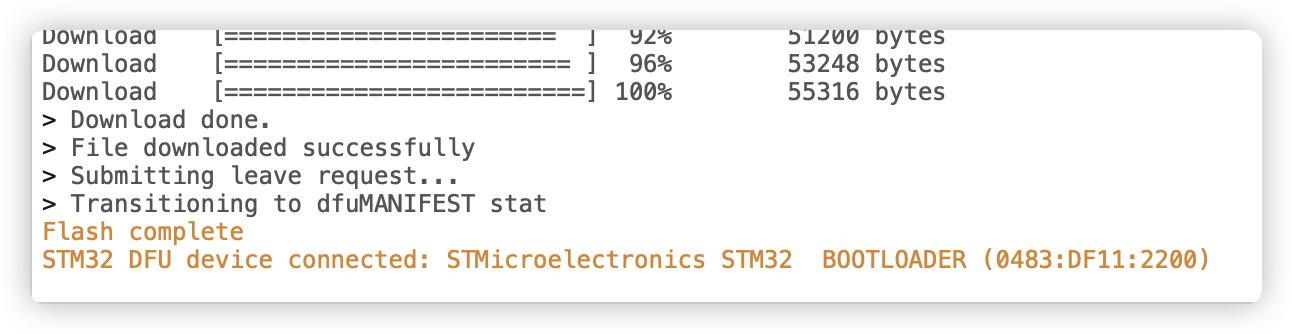
Downloading element to address = 0x08000000, size = 55316
Erase [=========================] 100% 55316 bytes
Erase done.
Download [=========================] 100% 55316 bytes
Download done.
File downloaded successfully
Submitting leave request...
Transitioning to dfuMANIFEST state
You've successfully flash your STM32 MCU!
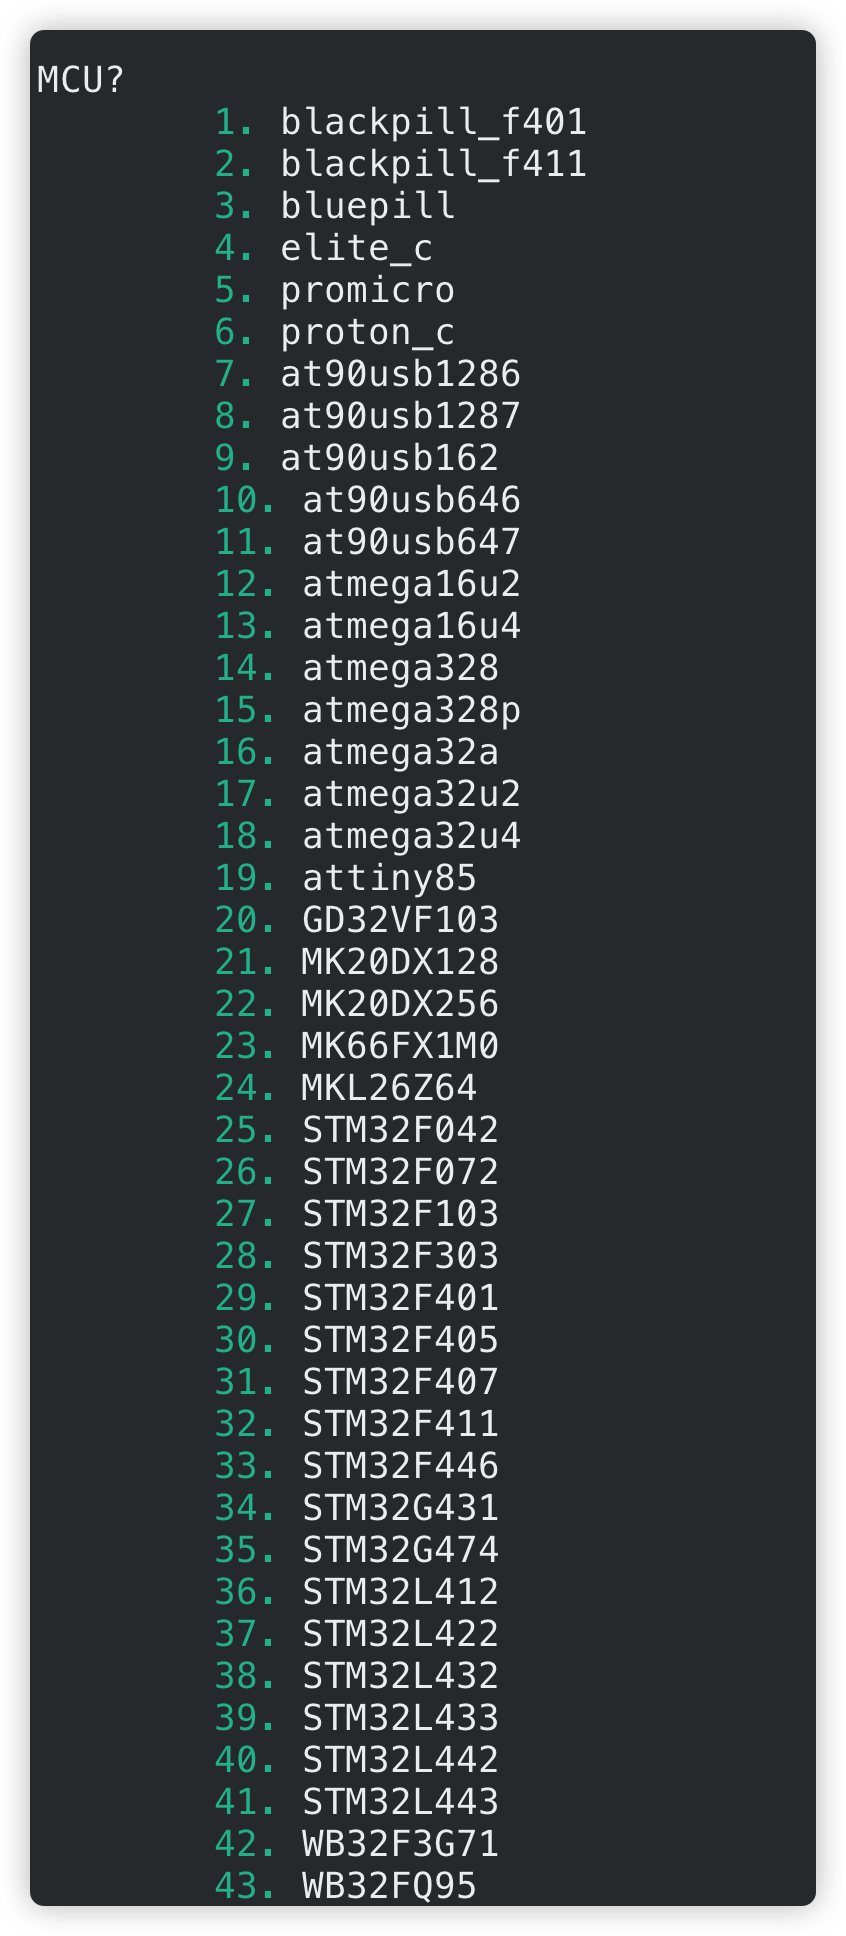
MCUs
注:
QMK默认支持的MCU列表