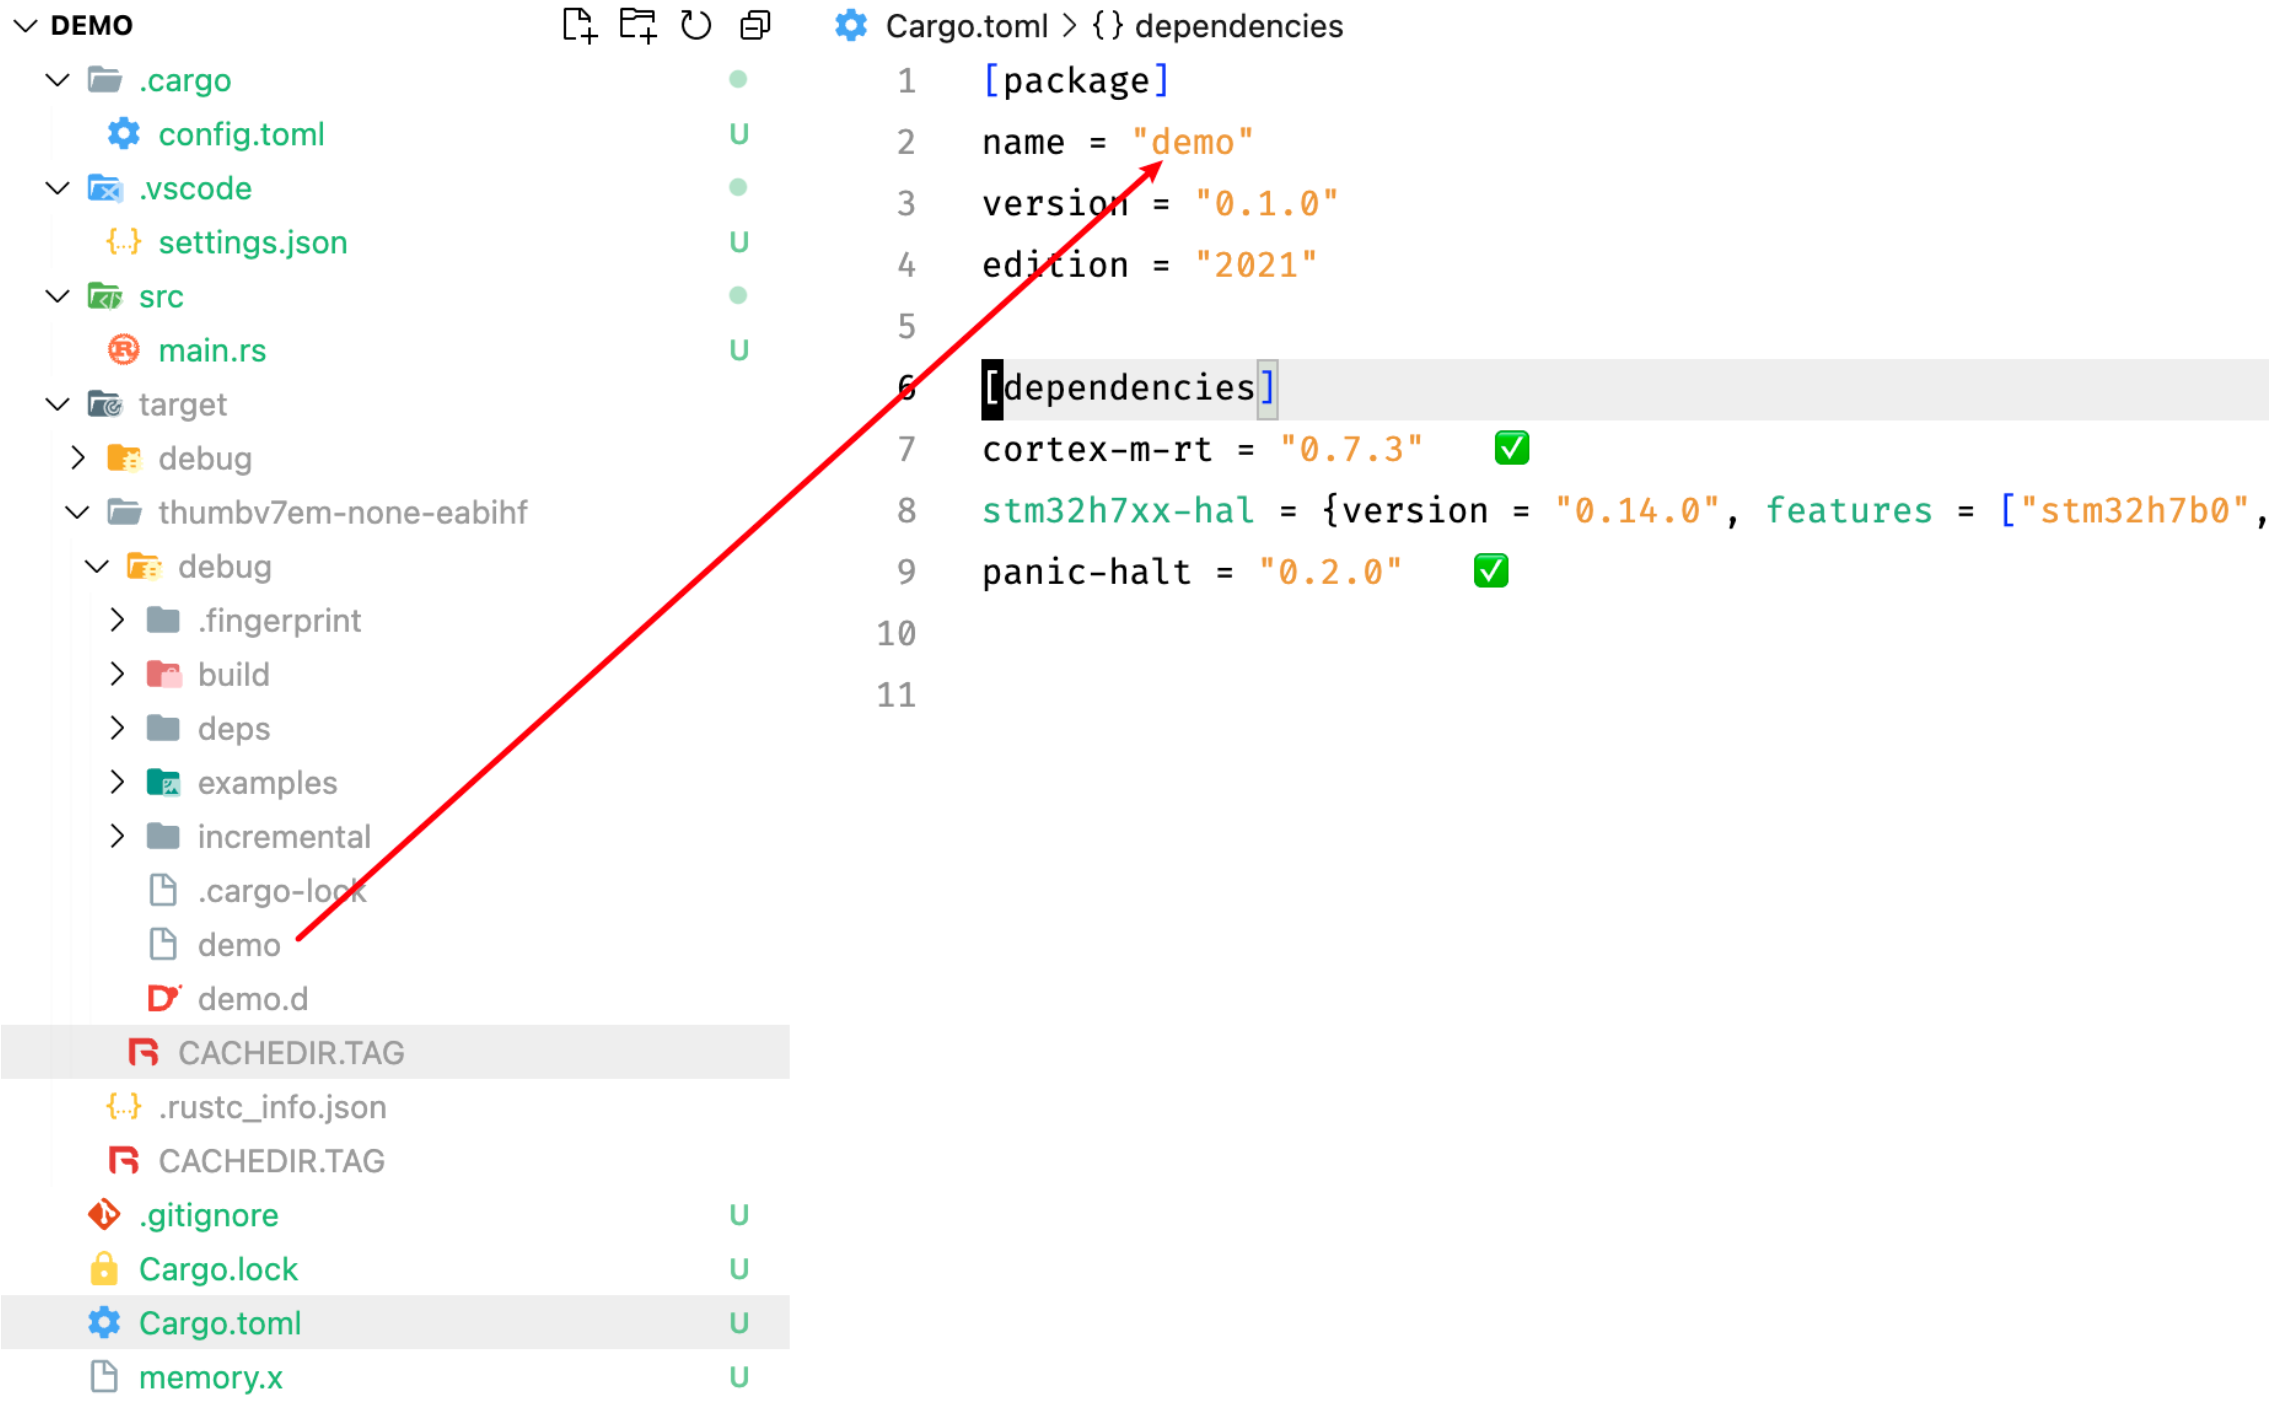
使用Rust开发STM32嵌入式程序入门教程

Why?

Rust作为一门新兴语言,其安全、可靠、运行效率高等特点让它成为一门非常适合嵌入式开发的语言。本文主要介绍如何搭建Rust嵌入式开发环境,然后使用stm32h7开发板点个灯。

在嵌入式开发领域,C语言的地位是无法被撼动的(至少在2023年是这样)。用Rust开发嵌入式目前就两个目的:

  1. 战未来 :)

适用对象

如果你没有接触过嵌入式编程,或者完全不懂gcc系列的开源工具链,或者完全没有接触过Rust,那么建议先了解一下相关的背景知识。

OK,Let's GO!

搭建Rust开发环境

安装Rust

首先第一步是安装Rust的开发环境。Rust开发环境的安装非常简单,参考https://rustup.rs/,一条命令即可:

1
curl --proto '=https' --tlsv1.2 -sSf https://sh.rustup.rs | sh

安装之后,可以使用下面的命令查看当前的Rust版本:

1
2
3
cargo --version
rustup --version
rustc --version

这里,几个工具简单了解一下:

  • cargo:是Rust的构建系统和包管理器,安装、配置三方包、项目构建你都需要用到他
  • rustc:Rust编译器,相当于gcc
  • rustup:Rust工具链管理工具,比如更新Rust版本、添加target等,都可以使用rustup

默认情况下,安装完Rust之后,编译的目标架构都是本机的架构。由于我们是嵌入式开发,因此需要交叉编译到MCU对应的架构,以stm32h7为例,它是ARM Cortex-m系列的MCU,其对应的target是:thumbv7em-none-eabihf。对于cortex-m系列的MCU来说,每种核心对应的target可以参考:https://logiase.github.io/The-Embedded-Rust-Book-CN/intro/install.html。

我们使用rustup来添加对应的交叉编译支持:

1
rustup target add thumbv7em-none-eabihf

运行完这个命令之后,你本地的Rust已经具备了编译对应MCU程序的能力。

安装嵌入式相关工具链

使用Rust开发嵌入式代码,还需要一系列其他的工具链,比如openocd、gdb等等。这些工具的安装和使用C语言时并没有太大的区别,同样可以参考:https://logiase.github.io/The-Embedded-Rust-Book-CN/intro/install.html,左侧选择你当前的PC平台,按照说明安装即可。我使用的是MacOS,安装相关工具非常简单,使用homebrew安装即可:

1
2
3
4
5
6
7
8
$ # GDB
$ brew install armmbed/formulae/arm-none-eabi-gcc

$ # OpenOCD
$ brew install openocd

$ # QEMU
$ brew install qemu

配置IDE

我们使用VSCode来开发Rust。VSCode的安装就不再废话了,这里着重讲一下需要安装的插件:

  • rust-analyzer:使用VSCode开发Rust必备
  • cortex-debug:调试、debug嵌入式程序
  • crates:提升编辑Cargo.toml的体验,辅助包管理

直接VSCode插件市场搜索安装即可。

一些背景知识

在配置完开发环境之后,我们缓一缓,简单了解一下使用Rust开发嵌入式工程的一些背景知识。

  1. 和C语言不同,Rust官方提供了一套标准的硬件抽象层embedded-hal,几乎所有的MCU厂家都会基于这套hal来开发自己的sdk。
  2. 各个厂商的相关SDK命名都遵循xxx-rs的方式,比如stm32就是stm32-rs,ESP是esp-rs,rp2040是rp-rs。如果我们想要找相关的SDK,就去对应的github组下面去找就好了。
  3. 在正式开发中,我们不会直接和embedded-hal打交道,而是使用各个厂家MCU对应的上层hal实现。我们使用的MCU是stm32h7b0,因此,直接去stm32-rs下面搜索stm32h7,就能看到对应的hal库stm32h7xx-hal了。当然也可以去crates.io搜索,一样的。使用对应的hal库也非常简单,在Cargo.toml[dependencies]下面添加一行
1
stm32h7xx-hal = { version = "0.14.0", features = ["stm32h7b0", "rt", "log-rtt"] }

即可。上面的配置说明我们使用的hal库版本是0.14.0,我们的芯片是stm32h7b0,并且开启了log-rtt特性。features中的rt代表着 runtime,一般都默认加上。

创建Rust嵌入式工程

在了解了相关背景知识之后,我们就可以去创建Rust嵌入式工程了。

方法1

直接使用官方模板创建,一条命令即可:

1
2
# 使用 rust 官方的 cortex-m-quickstart 作为我们的项目模板
cargo generate --git https://github.com/rust-embedded/cortex-m-quickstart

方法2

上面的创建方式会默认创建一个QEMU模拟器工程,如果你对Rust嵌入式开发不熟悉,把这个工程改成你的目标板的程序可能会有些麻烦。所以下面我们就从0开始,一步一步地搭建整个Rust嵌入式工程,在走完整个流程之后,你就可以了解每一个文件的具体功能,后面用项目模板一键创建工程改改就行了。下面详细按步骤介绍:

1. 创建空的Rust工程

这一步非常简单,使用cargo创建即可

1
cargo new project-name --bin --edition 2021

--bin表示创建的是一个可执行程序的工程(而不是一个库),--edition表示使用2021标准(也是最新版本)。使用VSCode打开工程,默认是一个本机的HelloWorld工程,命令行运行cargo run,运行。

2. 配置.cargo/config.toml

cargo new默认生成的工程的target是本机的架构,我们需要把target改成我们的目标MCU。

VSCode根目录下创建.cargo/config.toml文件,并且填入以下的内容:

 1
 2
 3
 4
 5
 6
 7
 8
 9
10
11
12
13
14
15
16
17
18
19
20
21
22
23
24
25
26
27
28
29
30
31
32
33
34
35
36
37
[target.thumbv7m-none-eabi]
# uncomment this to make `cargo run` execute programs on QEMU
# runner = "qemu-system-arm -cpu cortex-m3 -machine lm3s6965evb -nographic -semihosting-config enable=on,target=native -kernel"

[target.'cfg(all(target_arch = "arm", target_os = "none"))']
# uncomment ONE of these three option to make `cargo run` start a GDB session
# which option to pick depends on your system
runner = "arm-none-eabi-gdb -q -x openocd.gdb"
# runner = "gdb-multiarch -q -x openocd.gdb"
# runner = "gdb -q -x openocd.gdb"

rustflags = [
  # Previously, the linker arguments --nmagic and -Tlink.x were set here.
  # They are now set by build.rs instead. The linker argument can still
  # only be set here, if a custom linker is needed.

  # By default, the LLD linker is used, which is shipped with the Rust
  # toolchain. If you run into problems with LLD, you can switch to the
  # GNU linker by uncommenting this line:
  # "-C", "linker=arm-none-eabi-ld",

  # If you need to link to pre-compiled C libraries provided by a C toolchain
  # use GCC as the linker by uncommenting the three lines below:
  # "-C", "linker=arm-none-eabi-gcc",
  # "-C", "link-arg=-Wl,-Tlink.x",
  # "-C", "link-arg=-nostartfiles",
]

[build]
# Pick ONE of these default compilation targets
# target = "thumbv6m-none-eabi"        # Cortex-M0 and Cortex-M0+
# target = "thumbv7m-none-eabi"        # Cortex-M3
# target = "thumbv7em-none-eabi"       # Cortex-M4 and Cortex-M7 (no FPU)
target = "thumbv7em-none-eabihf"     # Cortex-M4F and Cortex-M7F (with FPU)
# target = "thumbv8m.base-none-eabi"   # Cortex-M23
# target = "thumbv8m.main-none-eabi"   # Cortex-M33 (no FPU)
# target = "thumbv8m.main-none-eabihf" # Cortex-M33 (with FPU)

每一个选项注释里面已经说的很明白了,注意核心是[build]下的target,这里就配置了使用cargo build构建工程的时候,默认的target。

3. 使用rust-toolchain.toml配置默认工具链

在很多情况下,我们想要使用最新的rust的feature,这些feature往往只在nightly版本的rust中生效。那么我们就可以在项目的根目录下创建一个rust-toolchain.toml文件,来配置当前项目使用的Rust工具链:

1
2
3
[toolchain]
channel = "nightly"
components = [ "rust-src", "rustfmt", "llvm-tools" ]

这里,我们使用了nightly版本的Rust,同时激活了下面三个component

4. 创建build.rs构建脚本

build.rs是Rust的一个特殊文件,它主要用于配置构建的流程和相关的参数。对比gcc,可以理解成CFLAGS、compile options这些玩意都可以在这里配置。其功能可以参考:https://doc.rust-lang.org/cargo/reference/build-scripts.html。

同时,如果你读的比较仔细,可以发现在上面的.cargo/config.toml中,有一个rustflags字段,也可以配置相关的选项。这两个地方的配置都可以生效。

针对cortex-m的默认build.rs如下,暂时可以直接复制一份到项目根目录下:

 1
 2
 3
 4
 5
 6
 7
 8
 9
10
11
12
13
14
15
16
17
18
19
20
21
22
23
24
25
26
27
28
29
30
31
32
33
34
35
36
37
38
39
40
41
42
43
//! This build script copies the `memory.x` file from the crate root into
//! a directory where the linker can always find it at build time.
//! For many projects this is optional, as the linker always searches the
//! project root directory -- wherever `Cargo.toml` is. However, if you
//! are using a workspace or have a more complicated build setup, this
//! build script becomes required. Additionally, by requesting that
//! Cargo re-run the build script whenever `memory.x` is changed,
//! updating `memory.x` ensures a rebuild of the application with the
//! new memory settings.
//!
//! The build script also sets the linker flags to tell it which link script to use.

use std::env;
use std::fs::File;
use std::io::Write;
use std::path::PathBuf;

fn main() {
    // Put `memory.x` in our output directory and ensure it's
    // on the linker search path.
    let out = &PathBuf::from(env::var_os("OUT_DIR").unwrap());
    File::create(out.join("memory.x"))
        .unwrap()
        .write_all(include_bytes!("memory.x"))
        .unwrap();
    println!("cargo:rustc-link-search={}", out.display());

    // By default, Cargo will re-run a build script whenever
    // any file in the project changes. By specifying `memory.x`
    // here, we ensure the build script is only re-run when
    // `memory.x` is changed.
    println!("cargo:rerun-if-changed=memory.x");

    // Specify linker arguments.

    // `--nmagic` is required if memory section addresses are not aligned to 0x10000,
    // for example the FLASH and RAM sections in your `memory.x`.
    // See https://github.com/rust-embedded/cortex-m-quickstart/pull/95
    println!("cargo:rustc-link-arg=--nmagic");

    // Set the linker script to the one provided by cortex-m-rt.
    println!("cargo:rustc-link-arg=-Tlink.x");
}

5. 创建链接脚本memory.x

Rust和C语言一样,在编译之后都需要一个链接脚本把所有的.o文件链接成可执行文件,这个链接脚本就是memory.x。Rust的链接脚本和gcc的ld文件一模一样。如果你不想自己写,可以从自己之前的gcc工程中直接把ld文件的内容复制过来,或者直接参考你开发板芯片对应的hal库的默认链接脚本。比如我使用的stm32h7,那么就在这个代码库里面找:https://github.com/stm32-rs/stm32h7xx-hal

6. 配置Cargo.toml

K,现在一个基础的Rust嵌入式开发环境已经搭建完成了。整个工程的结构大概长这样子:

1
2
3
4
5
6
7
.cargo
  - config.toml
src
  - main.rs
build.rs
Cargo.toml
rust-toolchain.toml

在上面这些外围的东西配置好了之后,我们就可以配置Cargo.toml了。通过Cargo使用三方包非常简单,在Cargo.toml[dependencies]下面,把你想要用的三方包加上,就可以了:

1
2
3
4
5
[dependencies]
cortex-m = "0.7.7"
cortex-m-rt = "0.7.3"
stm32h7xx-hal = {version = "0.14.0", features = ["stm32h7b0", "rt", "log-rtt"]}
panic-halt = "0.2.0"

作为最基础的程序,我们添加了上面四个crate,cortex-m用来操作cortex-m核心,cortex-m-rt是ARM Cortex-m核的运行时,stm32h7xx-hal是我们用的芯片的hal库,panic-halt可以理解成是hardfault处理程序,会直接halt暂停程序。如果不加这个,就需要手动实现hardfault处理代码。

7. 修改main.rs

在配置完三方包之后,就可以修改我们的主程序main.rs了。下面先把主程序粘贴过来,后面逐行讲解:

 1
 2
 3
 4
 5
 6
 7
 8
 9
10
11
12
#![no_main]
#![no_std]

use panic_halt as _;
use cortex_m_rt::entry;

#[entry]
fn main() -> ! {
    loop {
        panic!("hello world!");
    }
}

首先是两个声明#![no_main]#![no_std],这两句话说明我们的rust程序没有默认的main函数,也不使用std库。Rust中默认的main函数是std标准库中的函数,由于我们的target是嵌入式MCU,因此我们默认不使用std标准库,默认的main函数也不用了。

下面一行use panic_halt as _;表示我们使用panic-halt包提供的错误处理。

上面说我们没有使用的标准库的main函数,那我们的程序入口在哪里呢?看下面一行use cortex_m_rt::entry,意思就是我们会使用cortex-m-rt包提供的主函数入口,并且在对应的函数入口用#[entry]标识。下面就是我们的主函数了,我在主函数里面写了一个循环,并且调用了panic!,让程序panic,同时输出hello world。

8. 编译!

到这里,我们整个Rust的最简单的嵌入式工程就已经搭建完毕了。接下来,就编译我们的第一个Rust嵌入式程序:

1
2
# 编译程序
cargo build

因为我们已经在.cargo/config.toml里面配置好了target,所以cargo build命令的默认target就会是我们的MCU。如果一切正常的话,就可以在target/thumbv7em-none-eabihf/debug目录下看到你的固件了!需要注意的是,固件的文件名和Cargo.toml中的name完全一致:

image-20230901181101985

9. Hello World程序

到上一步为止,你已经可以使用写出并且编译第一个固件程序了。但是这个程序会直接panic。下面我们就再写一些代码,完成第一个Hello World程序,并且通过RTT打印出来。

首先,在Cargo.toml中添加RTT相关依赖:

1
2
3
rtt-target = "0.4.0"
panic-rtt-target = { version = "0.1.2", features = ["cortex-m"] }
log = "0.4.19"

第一个rtt-target让MCU可以实现RTT输出,第二个panic-rtt-target用来替代panic-halt,也就是在panic的时候,通过rtt-target来输出相关信息,而不是直接停止MCU运行。第三个是Rust的log包,提供了logging相关的trait。

然后,修改main.rs代码如下:

 1
 2
 3
 4
 5
 6
 7
 8
 9
10
11
12
13
14
15
16
17
18
19
20
21
22
23
24
25
26
27
28
29
30
31
32
33
34
35
36
37
38
#![no_main]
#![no_std]

use cortex_m_rt::entry;
use panic_rtt_target as _;
use rtt_target::{rprintln, rtt_init_print};
use stm32h7xx_hal::{pac, prelude::*};

#[entry]
fn main() -> ! {
    // 初始化RTT
    rtt_init_print!();
    // 获取cortex核心外设和stm32h7的所有外设
    let cp = cortex_m::Peripherals::take().unwrap();
    let dp = pac::Peripherals::take().unwrap();

    // Power 设置
    let pwr = dp.PWR.constrain();
    let pwrcfg = pwr.freeze();
    // 初始化RCC
    let rcc = dp.RCC.constrain();
    let ccdr = rcc.sys_ck(200.MHz()).freeze(pwrcfg, &dp.SYSCFG);

    // 设置LED对应的GPIO
    let gpioe = dp.GPIOE.split(ccdr.peripheral.GPIOE);
    let mut led = gpioe.pe3.into_push_pull_output();

    // cortex-m已经实现好了delay函数,直接拿到,下面使用
    let mut delay = cp.SYST.delay(ccdr.clocks);

    loop {
        // 点灯并且输出RTT日志
        led.toggle();
        rprintln!("Hello World!");
        // 延时500ms
        delay.delay_ms(500_u16);
    }
}

简单解释一下main函数。首先,使用rtt_init_print!()初始化RTT功能。然后,通过cortex_mstm32h7xx的PAC,获取cortex核的外设对象还有stm32h7的外设对象。后面就是初始化PWR和RCC,并且设置主频为200MHZ。注意在这里,每一个设置最后都需要调用freeze函数,表示把所有的设置写入对应寄存器。如果你知道builder模式,那你应该对这种操作很熟悉。

接着,就从MCU外设中拿到GPIO,并且设置LED对应的GPIO状态。最后,在主循环里面点灯并且使用RTT打印。

运行cargo build,编译一切OK。

Debug Rust嵌入式程序

编译好了第一个固件之后,下一步就是烧录 & 调试了。实话实说,烧录和调试和Rust本身关系不太大,使用的还是openocd 那一套。这里就主要写一下如何在VSCode下面调试Rust嵌入式程序。

首先,还是安装cortex-debug插件,并且配置.vscode/launch.json。具体可以参考我之前的blog:使用OpenOCD+VSCode一键烧录Boot+App到内置+外置flash的VSCode配置部分即可。这里我也贴一下我使用的launch.json

 1
 2
 3
 4
 5
 6
 7
 8
 9
10
11
12
13
14
15
16
17
18
19
20
21
22
23
24
25
26
27
28
29
30
31
32
33
34
35
{
    "version": "0.2.0",
    "configurations": [
        {
            "name": "Cortex Debug",
            "cwd": "${workspaceFolder}",
            "executable": "${workspaceFolder}/target/thumbv7em-none-eabihf/debug/你的固件名称",
            "request": "launch",
            "type": "cortex-debug",
            "servertype": "openocd",
            "showDevDebugOutput": "parsed",
            "runToEntryPoint": "main",
            "device": "stlink",
            "preLaunchTask": "flash",
            "configFiles": [
                "openocd.cfg"
            ],
            "svdFile": "STM32H7B0x.svd",
            "rttConfig": {
                "enabled": true,
                "address": "auto",
                "clearSearch": false,
                "polling_interval": 20,
                "rtt_start_retry": 2000,
                "decoders": [
                    {
                        "label": "RTT channel 0",
                        "port": 0,
                        "type": "console"
                    }
                ]
            },
        }
    ]
}

需要注意的是,executable需要改成你的固件路径,然后配置好对应的openocd.cfgsvd文件即可。

另外,这里只是启动调试,我配置了一个preLaunchTask,会在每一次调试之前自动烧录固件。这个task是配置在.vscode/tasks.json中:

 1
 2
 3
 4
 5
 6
 7
 8
 9
10
11
12
13
14
15
16
17
18
19
20
21
22
23
24
25
26
27
28
{
    "version": "2.0.0",
    "tasks": [
       {
            "label": "Cargo Build (debug)",
            "type": "process",
            "command": "cargo",
            "args": ["build"],
            "problemMatcher": [
                "$rustc"
            ],
            "group": {
                "kind": "build",
                "isDefault": true
            }
        },
        {
            "label": "flash",
            "group": "build",
            "type": "shell",
            "command": "openocd -f openocd.cfg -c \"program target/thumbv7em-none-eabihf/debug/你的固件名称 preverify verify reset exit\"",
            "dependsOn": [
                "Cargo Build (debug)"
            ],
            "dependsOrder": "sequence"
        },
    ]
}

需要注意的是,这里的烧录的openocd command,同样需要把固件路径改成你自己的。

配置完这两个json文件之后,点击F5,VSCode就会自动编译、烧录固件、开启调试。默认情况下,调试的时候会首先停在程序入口处,需要手动点击运行:

image-20230901181121569

点击运行之后,就可以看到点灯成功,并且在下面终端Tab的RTT Channel中,可以看到MCU发过来的实时日志了:

image-20230901181134419

到现在为止,终于使用Rust在stm32上面点灯成功了,完结撒花🎉

updatedupdated2024-05-102024-05-10