RMK


![]()
RMK is a Rust keyboard firmware crate with lots of usable features, like layer support, dynamic keymap, vial support, BLE wireless, etc, makes firmware customization easy and accessible.
Overview
This guide aims to introduce you how to build your own keyboard firmware using RMK and run it on your microcontroller. There are 3 steps of the guide:
-
setup the RMK environment
-
create a RMK project
-
compile the firmware and flash
If you get any questions or problems following this guide, please fire an issue at https://github.com/HaoboGu/rmk/issues.
Before we start
Using RMK requires basic knowledge of Rust programming and embedded devices. If you're not familiar with Rust, The Official Rust Book is a good start. And, if you're not familiar with embedded Rust, we recommend you to read The Embedded Rust Book first. We'll keep working on making RMK more accessible for everybody.
Setup RMK environment
In this section, you'll setup the Rust development environment, install all needed components for compiling and flashing RMK.
1. Install Rust
RMK is written in Rust, so first you have to install Rust to your host. Installing Rust is easy, checkout https://rustup.rs and follow the instructions.
Here is a more detailed guide for installing Rust.
2. Choose your hardware
RMK firmware runs on microcontrollers, by using Embassy as the runtime, RMK supports many series of microcontrollers, such as stm32, nrf52 and rp2040. Choose one of the supported microcontroller makes your journey of RMK much easier.
If you're using other microcontrollers, make sure your microcontroller supports Embassy.
3. Install your target
The next step is to add Rust's compilation target of your chosen microcontroller. Rust's default installation include only your host's compilation target, so you have to install the compilation target of your microcontroller manually.
Different microcontrollers with different architectures may have different compilation targets, if you're using ARM Cortex-M microcontrollers, here is a simple target list.
For example, rp2040 is a Cortex-M0+ microcontroller, it's compilation target is thumbv6m-none-eabi. Use rustup target add command to install it:
rustup target add thumbv6m-none-eabi
4. Add other tools
There are several other tools are highly recommended:
-
cargo generate: needed for creating a RMK firmware project from RMK project template -
probe-rs: used to flash and debug your firmware
You can use the following commands to install them:
cargo install cargo-generate
cargo install probe-rs --features cli
Now you're all set for RMK! In the next section, you'll learn how to create your own RMK firmware project.
Create RMK firmware project
In this section, you'll create your own RMK firmware project using RMK project template and cargo-generate.
1. Create from template
RMK provides a project template, making it much easier to create your own
firmware using your favorite microcontroller. cargo-generate is required to use the template, you can install it using
the following command:
cargo install cargo-generate
Then you can create your RMK firmware project with a single command:
cargo generate --git https://github.com/HaoboGu/rmk-template
This command would ask you to fill some basic info of your project, it requires a little bit deeper understanding of
your chosen hardware. If you don't know what to fill, check this section in overview first. The following is an
example. In the example, a stm32 microcontroller stm32h7b0vb is used, the corresponding target
is thumbv7em-none-eabihf:
$ cargo generate --git https://github.com/HaoboGu/rmk-template
🤷   Project Name: rmk-demo
🔧   Destination: /Users/haobogu/Projects/keyboard/rmk-demo ...
🔧   project-name: rmk-demo ...
🔧   Generating template ...
✔ 🤷   Choose your microcontroller family · stm32
✔ 🤷   Choose your microcontroller's target · thumbv7em-none-eabihf
🤷   Enter your MCU model(Embassy feature name): stm32h7b0vb
️️👉👉👉 For the following steps, search 'TODO' in generated project
🔧   Moving generated files into: `/Users/haobogu/Projects/keyboard/rmk-demo`...
🔧   Initializing a fresh Git repository
✨   Done! New project created /Users/haobogu/Projects/keyboard/rmk-demo
A RMK firmware project will be automatically created after you fill out all required fields.
Use code <your-project-name> to open the project in VSCode. If you're lucky enough, you project could just compile with cargo build command!
But for the most of the cases, there are minor modifications you have to do. There are two ways to use config your RMK keyboard in your firmware project:
-
use a config file:
keyboard.tomlFor new users, it's recommend to use
keyboard.tomlto config your keyboard. This config file contains almost all about your keyboard, with it, you can create your firmware very conveniently, no Rust code needed! Please check Keyboard Configuration feature for configuration details. -
If the configuration doesn't satisfy all your needs(it would mostly do!), you can write your own Rust code to do more customization! RMK also provides some examples to help you quickly get throught it.
Use keyboard.toml
The generated main.rs should be like:
#![allow(unused)]
fn main() {
use crate::keymap::KEYMAP;
use rmk::macros::rmk_keyboard;
use vial::{VIAL_KEYBOARD_DEF, VIAL_KEYBOARD_ID};

#[rmk_keyboard]
mod keyboard {}
}
There's a macro rmk_keyboard that does the magic for you. This macro will automatically read the keyboard.toml in your project root and generate all boilerplate code for you.
There're steps you have to do to customize your own firmware:
Edit keyboard.toml
The generated keyboard.toml should have some fields configured from cargo generate. But there are still some fields that you want to fill, such as the pin matrix, led config, etc. The Keyboard Configuration section has full instructions of how to write your own keyboard.toml. Follow the doc and report any issues/questions at https://github.com/HaoboGu/rmk/issues. We appreciate your feedback!
Update memory.x
memory.x is the linker script of Rust embedded project, it's used to define the memory layout of the microcontroller. RMK enables memory-x feature for embassy-stm32, so if you're using stm32, you can just ignore this step.
For other ARM Cortex-M microcontrollers, you only need to update the LENGTH of FLASH and RAM to your microcontroller.
You can either checkout your microcontroller's datasheet or existing Rust project of your microcontroller for it.
Add your own layout
The next step is to add your own keymap layout for your firmware. RMK supports vial app, an open-source cross-platform(windows/macos/linux/web) keyboard configurator. So the vial like keymap definition has to be imported to the firmware project.
Fortunately, RMK does most of the heavy things for you, all you need to do is to create your own keymap definition and
convert it to vial.json following vial's doc here, and place it
at the root of the firmware project, replacing the default one. RMK would do all the rest things for you.
Add your default keymap
Default keymap config should be moved to
keyboard.toml, but it's just not done yet. PRs welcome!
After adding the layout of your keyboard, the default keymap should also be updated. The default keymap is defined
in src/keymap.rs, update keyboard matrix constants and KEYMAP according to your keyboard. RMK provides a bunch of
useful macros helping you define your keymap. Check
out keymap_configuration chapter for more details.
Use Rust
By default, the generated project uses keyboard.toml to config the RMK keyboard firmware. If you want to customize your firmware using Rust, there're some steps to do to make the generated firmware project compile:
Update memory.x
memory.x is the linker script of Rust embedded project, it's used to define the memory layout of the microcontroller. RMK enables memory-x feature for embassy-stm32, so if you're using stm32, you can just ignore this step.
For other ARM Cortex-M microcontrollers, you only need to update the LENGTH of FLASH and RAM to your microcontroller.
You can either checkout your microcontroller's datasheet or existing Rust project of your microcontroller for it.
Update USB interrupt binding in main.rs
Next, you have to check generated src/main.rs, make sure that the binded USB interrupt is right. Different
microcontrollers have different types of USB peripheral, so does bind interrupt. You can check
out Embassy's examples for how to bind the USB interrupt
correctly.
For example, if you're using stm32f4, there is an usb serial example there. And code for binding USB interrupt is at line 15-17:
#![allow(unused)]
fn main() {
bind_interrupts!(struct Irqs {
    OTG_FS => usb_otg::InterruptHandler<peripherals::USB_OTG_FS>;
});
}
Don't forget to import all used items!
Add your own layout
The next step is to add your own keymap layout for your firmware. RMK supports vial app, an open-source cross-platform(windows/macos/linux/web) keyboard configurator. So the vial like keymap definition has to be imported to the firmware project.
Fortunately, RMK does most of the heavy things for you, all you need to do is to create your own keymap definition and
convert it to vial.json following vial's doc here, and place it
at the root of the firmware project, replacing the default one. RMK would do all the rest things for you.
Add your default keymap
After adding the layout of your keyboard, the default keymap should also be updated. The default keymap is defined
in src/keymap.rs, update keyboard matrix constants and KEYMAP according to your keyboard. RMK provides a bunch of
useful macros helping you define your keymap. Check
out keymap_configuration chapter for more details.
Define your matrix
Next, you're going to change the IO pins of keyboard matrix making RMK run on your own PCB. Generally, IO pins are
defined in src/main.rs. RMK will generate a helper macro to help you to define the matrix. For example, if you're
using rp2040, you can define your pins using config_matrix_pins_rp!:
#![allow(unused)]
fn main() {
let (input_pins, output_pins) = config_matrix_pins_rp!(
    peripherals: p,
    input: [PIN_6, PIN_7, PIN_8, PIN_9],
    output: [PIN_19, PIN_20, PIN_21]
);
}
input and output are lists of used pins, change them accordingly.
So far so good, you've done all necessary modifications of your firmware project. You can also check TODOs listed in the generated README.md file.
Compile and flash!
In this section, you'll be able to compile your firmware and flash it to your microcontroller.
Compile the firmware
To compile the firmware is easy, just run
cargo build --release
If you've done all the previous steps correctly, you can find your compiled firmware at target/<your_target>/release folder.
If you encountered any problems when compiling the firmware, please report it here.
Flash the firmware
The last step is to flash compiled firmware to your microcontroller. This needs a debug probe like daplink, jlink or stlink(stm32 only). If you've got your debug probe, connect it with your board and host, make sure you have installed probe-rs, then just run
cargo run --release
The firmware will be flashed to your microcontroller and the firmware will run automatically, yay!
For more configurations of RMK, you can check out feature documentations on the left.
Configuration
RMK provides an easy and accessible way to set up the keyboard with a toml config file, even without Rust code!
rmk = { version = "0.1.12", git = "https://github.com/HaoboGu/rmk" }
in your Cargo.toml to use it
Usage
A toml file named keyboard.toml is used as a configuration file. The following is the spec of toml:
[Here] is an example keyboard.toml for stm32 microcontroller, put your keyboard.toml at the root of your firmware project.
RMK provides a proc-macro to load the keyboard.toml: #[rmk_keyboard], add it to your main.rs like:
#![allow(unused)]
fn main() {
#[rmk_keyboard]
mod my_keyboard {}
}
And, that's it! #[rmk_keyboard] macro would load your keyboard.toml config and create everything that's needed for creating a RMK keyboard instance.
If you don't want any other customizations beyond the keyboard.toml, #[rmk_keyboard] macro will just work. For the full examples, please check the example/use_config folder.
What's in the config file?
The config file contains almost EVERYTHING that users could customize to build a keyboard. There are several sections in the config file:
[keyboard]
[keyboard] section contains basic information of the keyboard, such as keyboard's name, chip, etc:
[keyboard]
name = "RMK Keyboard"
vendor_id = 0x4c4b
product_id = 0x4643
manufacturer = "RMK"
chip = "stm32h7b0vb"
# If your chip doesn't have a functional USB peripheral, for example, nRF52832/esp32c3(esp32c3 has only USB serial, not full functional USB), set `usb_enable` to false
usb_enable = true
[matrix]
[matrix] section defines the key matrix information of the keyboard, like number of rows, cols and keymap layers, input/output pins.
IO pins are represented with an array of string, the string value should be the GPIO peripheral name of the chip. For example, if you're using stm32h750xb, you can go to https://docs.embassy.dev/embassy-stm32/git/stm32h750xb/peripherals/index.html to get the valid GPIO peripheral name:
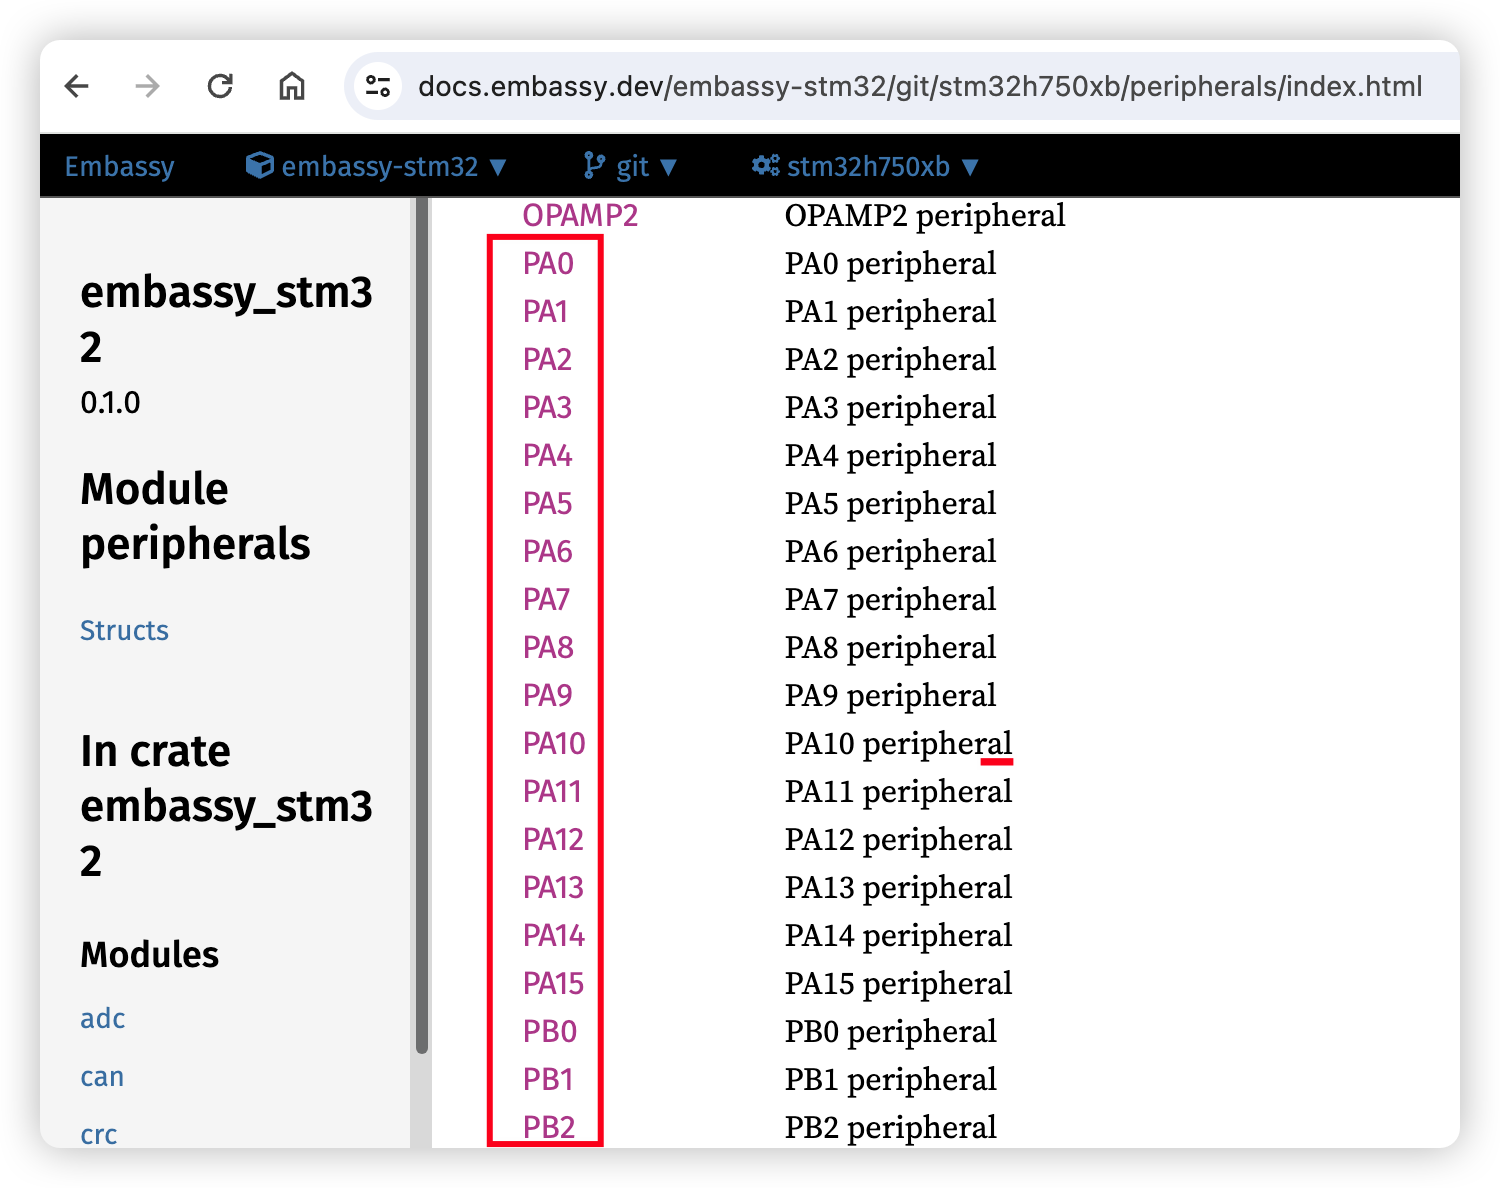
The GPIO peripheral name varies for different chips. For example, RP2040 has PIN_0, nRF52840 has P0_00 and stm32 has PA0. So it's recommended to check the embassy's doc for your chip to get the valid GPIO name first.
Here is an example toml of [matrix] section for stm32:
[matrix]
rows = 4
cols = 3
layers = 2
# Input and output pins are mandatory
input_pins = ["PD4", "PD5", "PD6", "PD3"]
output_pins = ["PD7", "PD8", "PD9"]
# WARNING: Currently row2col/col2row is set in RMK's feature gate, configs here do nothing actually
# row2col = true
[layout]
[layout] section contains the default keymap for the keyboard. It's currently not implemented, PRs welcome!
[light]
[light] section defines lights of the keyboard, aka capslock, scrolllock and numslock. They are actually an input pin, so there are two fields available: pin and low_active.
pin field is just like IO pins in [matrix], low_active defines whether the light low-active or high-active(true means low-active).
[light]
# All light pins are high-active by default, uncomment if you want it to be low-active
capslock.pin = "PA4"
# capslock.low_active = true
scrolllock.pin = "PA3"
# scrolllock.low_active = true
# Just ignore if no light pin is used for it
# numslock.pin = "PA5"
# numslock.low_active = true
[storage]
[storage] section defines storage related configs. Storage feature is required to persist keymap data, it's strongly recommended to make it enabled(and it's enabled by default!). RMK will automatically use the last two section of chip's internal flash as the pre-served storage space. If you don't want to change the default setting, just leave this section empty.
[storage]
# Storage feature is enabled by default
# enabled = false
# Start address of local storage, MUST BE start of a sector.
# If start_addr is set to 0(this is the default value), the last `num_sectors` sectors will be used.
# start_addr = 0x00000000
# How many sectors are used for storage, the default value is 2
# num_sectors = 2
[ble]
To enable BLE, add enabled = true under the [ble] section.
There are several more configs for reading battery level and charging state, now they are available for nRF52840 only.
[ble]
# Whether to enable BLE feature
enabled = true
# nRF52840's saadc pin for reading battery level
battery_pin = "PA0"
# Pin that reads battery's charging state, `low-active` means the battery is charging when `charge_state.pin` is low
charge_state.pin = "PA0"
charge_state.low_active = true
Keymap config(draft)
NOTE: THIS FEATURE IS NOT AVAILABLE NOW, USE keymap.rs BEFORE IT'S COMPLETED AND GOT MERGED TO MASTER.
Suggestions are welcomed!
You can set your keyboard's default keymap in keyboard.toml. The config key is default_keymap under [layout] section:
[layout]
default_keymap = [
  # Your default keymap here
]
The keymap inside is a 2-D array, which represents layer -> row -> key structure of your keymap:
[layout]
default_keymap = [
  # Layer 1
  [
    ["key1", "key2"], # Row 1
    ["key1", "key2"], # Row 2
    ...
  ],
  # Layer 2
  [
    [], # Row 1
    [], # Row 2
    ...
  ],
  ...
]
The number of layers/rows/cols should be identical with what's already in [matrix] section.
In each row, some keys are set. Due to the limitation of toml file, all keys are strings. RMK would parse the strings and fill them to actual keymap initializer, like what's in keymap.rs
The key string should follow several rules:
-
For a simple keycode(aka keys in RMK's
KeyCodeenum), just fill its name.For example, if you set a keycode
"Backspace", it will be turned toKeyCode::Backspace. So you have to ensure that the keycode string is valid, or RMK wouldn't compile! -
For no-key, use
"__" -
RMK supports many advanced layer operations:
- Use
"MO(n)"to create a layer activate action - Use
"LM(n, modifier)"to create layer activate with modifier action. The modifier can be likeLShift | RGui - Use
"LT(n, key)"to create a layer activate action or tap key(tap/hold) - Use
"OSL(n)"to create a one-shot layer action - Use
"TT(n)"to create a layer activate or tap toggle action - Use
"TG(n)"to create a layer toggle action
- Use
The definitions of those operations are same with QMK, you can found here
More customization
#[rmk_keyboard] macro also provides some flexibilities of customizing the keyboard's behavior. For example, the clock config:
#![allow(unused)]
fn main() {
#[rmk]
mod MyKeyboard {
  use embassy_stm32::Config;

  #[config]
  fn config() -> Config {
    let mut config = Config::default();
    {
        use embassy_stm32::rcc::*;
        config.rcc.hsi = Some(HSIPrescaler::DIV1);
        // ... other rcc configs below
    }
    config
  }
}
}
RMK should use the config from the user defined function to initialize the singleton of chip peripheral, for stm32, you can assume that it's initialized using let p = embassy_stm32::init(config);.
TODOs:
- gen keymap
- read vial.json and gen
Keymap configuration
RMK supports configuring the default keymap at the compile time. Keymap in RMK is a 3-D matrix of KeyAction, which represent the keyboard's action after you trigger a physical key. The 3 dimensions are the number of columns, rows and layers.
The default keymap should be defined at a Rust source file, rmk-template provides an initial keymap.rs which could be a good example of defining keymaps in RMK:
#![allow(unused)]
fn main() {
/// https://github.com/HaoboGu/rmk-template/blob/master/src/keymap.rs
use rmk::action::KeyAction;
use rmk::{a, k, layer, mo};
pub(crate) const COL: usize = 3;
pub(crate) const ROW: usize = 4;
pub(crate) const NUM_LAYER: usize = 2;

#[rustfmt::skip]
pub static KEYMAP: [[[KeyAction; COL]; ROW]; NUM_LAYER] = [
    layer!([
        [k!(AudioVolUp), k!(B), k!(AudioVolDown)],
        [k!(Kp4), k!(LShift), k!(Kp6)],
        [mo!(1), k!(Kp2), k!(Kp3)],
        [mo!(1), a!(No), k!(Kp0)]
    ]),
    layer!([
        [k!(Kp7), k!(Kp8), k!(Kp9)],
        [k!(Kp4), k!(LCtrl), k!(Kp6)],
        [mo!(1), k!(Kp2), k!(Kp3)],
        [mo!(1), a!(No), k!(Kp0)]
    ]),
];
}
First of all, the keyboard matrix's basic info(number of rows, cols and layers) is defined as consts:
#![allow(unused)]
fn main() {
pub(crate) const COL: usize = 3;
pub(crate) const ROW: usize = 4;
pub(crate) const NUM_LAYER: usize = 2;
}
Then, the keymap is defined as a static 3-D matrix of KeyAction:
#![allow(unused)]
fn main() {
pub static KEYMAP: [[[KeyAction; COL]; ROW]; NUM_LAYER] = [
    ...
]
}
A keymap in RMK is a 3-level hierarchy: layer - row - column. Each keymap is a slice of layers whose length is NUM_LAYER. Each layer is a slice of rows whose length is ROW, and each row is a slice of KeyActions whose length is COL.
RMK provides a bunch of macros which simplify the keymap definition a lot. You can check all available macros in RMK doc. For example, layer! macro is used to define a layer. k! macro is used to define a normal key in the keymap. If there is no actual key at a position, you can use a!(No) to represent KeyAction::No.
Vial support
RMK uses vial as the default keymap editor. By using vial, you can change your keymapping at real-time, no more programming/flashing is needed.
To persistently save your keymap data, RMK will use the last two sectors of your microcontroller's internal flash. If you don't have enough flash for saving keymaps, changing in vial will lose after keyboard reboot.
Port vial
To use vial in RMK, a keyboard definition file named vial.json is necessary. Vial has a very detailed documentation for how to generate this JSON file: https://get.vial.today/docs/porting-to-via.html. One note for generating vial.json is that you have to use same layout definition of internal keymap of RMK, defined in src/keymap.rs.
After getting your vial.json, just place it at the root of RMK firmware project, and that's it. RMK will do all the rest work for you.
Wireless
RMK has built-in wireless(BLE) support for nRF52840 and nRF52832. Supporting of other nRF52 microcontrollers should be quite easy to add. To use the wireless feature, enable nrf52832_ble or nrf52840_ble feature gate in your Cargo.toml:
rmk = { version = "0.1.12", features = [
    "nrf52840_ble",
    "col2row",
] }
RMK also provides ble examples, check nrf52840_ble and nrf52832_ble.
Due to multiple targets are not supported by docs.rs right now, so API documentations are not there. Check examples for the usage. I'll add a separate doc site later.
Flashing to your board
RMK can be flashed via a debug probe or USB. Follow the instruction in the examples/use_rust/nrf52840_ble/README.md
Nice!nano support
RMK has special support for nice!nano, a widely used board for building wireless keyboard.
nice!nano has a built-in bootloader, enables flashing a .uf2 format firmware via USB drive. examples/use_rust/nrf52840_ble/README.md provides instructions to convert RMK firmware to .uf2 format and flash to nice!nano.
There is another way to flash RMK firmware to nice!nano. It requires a modified version of elf2uf2-rs. The following are the steps:
- Install
elf2uf2-rsfrom https://github.com/simmsb/elf2uf2-rs:cargo install --git https://github.com/simmsb/elf2uf2-rs - Enter nice!nano's bootloader mode, a USB drive should appear in your machine
- Check the softdevice version of your nice!nano. If it's v6.x.x, edit
memory.x:- FLASH : ORIGIN = 0x00027000, LENGTH = 868K + FLASH : ORIGIN = 0x00026000, LENGTH = 872K - Update cargo runner in
.cargo/config.toml, usingelf2uf2-rs:[target.'cfg(all(target_arch = "arm", target_os = "none"))'] - runner = "probe-rs run --chip nRF52840_xxAA" + runner = "elf2uf2-rs -d" - Flash using
cargo run --release
Storage
TODO: Update storage documentation
Storage feature is used by saving keymap edits to internal flash. By default, it uses last 2 sectors of your microcontroller's internal flash. So you have to ensure that you have enough flash space for storage feature if you pass the storage argument to RMK. If there is not enough space, passing None is acceptable.
If you're using nrf528xx + BLE, this feature is automatically enabled because it's required to saving BLE bond info.
Future work:
- make it configurable that how many sectors to be used(but at least 2)
- add storage to RMK feature gate, disable all related stuffs if the feature is not enabled. This could save a lot of flash
- Save more configurations to storage
Binary size
RMK has included many optimizations by default to of binary size. But there are still some tricks to reduce the binary size more. If you got linker error like:
= note: rust-lld: error:
        ERROR(cortex-m-rt): The .text section must be placed inside the FLASH memory.
        Set _stext to an address smaller than 'ORIGIN(FLASH) + LENGTH(FLASH)'
or some errors occur when writing configs to flash, that means that your microcontroller's internal flash is not big enough.
There are several approaches to solve the problem:
Change DEFMT_LOG level
Logging is quite useful when debugging the firmware, but it requires a lot of flash. You can change the default logging level to error at .cargo/config.toml, to print only error messages and save flash:
# .cargo/config.toml

[env]
- DEFMT_LOG = "debug"
+ DEFMT_LOG = "error"
Use panic-halt
By default, RMK uses panic-probe to print error messages if panic occurs. But panic-probe actually takes lots of flash because the panic call can not be optimized. The solution is to use panic-halt instead of panic-probe:
# In your binary's Cargo.toml

- panic-probe = { version = "0.3", features = ["print-defmt"] }
+ panic-halt = "0.2"
The in main.rs, use panic-halt instead:
// src/main.rs

- use panic_probe as _;
+ use panic_halt as _;
Remove defmt-rtt
You can also remove the entire defmt-rtt logger to save flash.
# In your binary's Cargo.toml
- defmt-rtt = "0.4"
In this case, you have to implement an empty defmt logger.
# src/main.rs
- use defmt_rtt as _;

+ #[defmt::global_logger]
+ struct Logger;
+
+ unsafe impl defmt::Logger for Logger {
+     fn acquire() {}
+     unsafe fn flush() {}
+     unsafe fn release() {}
+     unsafe fn write(_bytes: &[u8]) {}
+ }
Enable unstable feature
According to embassy's doc, you can set the following in your .cargo/config.toml
[unstable]
build-std = ["core"]
build-std-features = ["panic_immediate_abort"]
And then compile your project with nightly Rust:
cargo +nightly build --release
# Or
cargo +nightly size --release
This config will reduce about 4-6kb of binary size furthermore.
After applying all above approaches, total binary size of stm32h7 example can be reduced from about 93KB to 54KB, which means the binary size decreases about 42%!
Make storage optional
Making storage feature optional and marking sequential-storage dependency as optional could also reduce the binary size a lot.
This work is not done yet, if there is still binary size issue for your microcontroller, please fire an issue at https://github.com/HaoboGu/rmk/issues and let us know! We'll improve the priority of this feature if we got sufficient feedback.
Any PRs are also welcomed.
Roadmap
There are a bunch of things to do with RMK in the near future. I plan to ship 1.0.0 after all the following items are accomplished.
Roadmap to 1.0.0
| Mark | Description |
|---|---|
| 🔴 | important |
| 🟢 | easy |
| 🔵 | massive work |
keyboard feature
- layer support
- system/media/mouse keys
- LED
- full async key detection and report sending
- 🔴 RGB
- keyboard macros
- 🟢 encoder
- 🔵 display support
- tap/hold
- 🔵 split keyboard support
Wireless
- BLE support - nRF
- auto switch between BLE/USB
- battery service from ADC
- 🔴 BLE support - esp32c3
- 🔴 BLE support - all esp32 chips
- 🔵 universal BLE wrapper, including BLE management, battery management, supports both nRF and ESP at least
- stablizing BLE feature gate/API
- sleep mode to save battery
- BLE support - ch58x/ch59x
User experience
- vial support
- 🔴🔵 GUI configurator which supports windows/macos/linux/web
- default bootloader
- USB DFU/OTA
- 🔴 easy keyboard configuration with good default, support different MCUs
- making vial and default keymap consistent automatically
- good documentation
If you want to contribute, please feel free to open an issue or PR, or just ping me! Any forms of contribution are welcome :D