Configuration
RMK provides an easy and accessible way to set up the keyboard with a toml config file, even without Rust code!
rmk = { version = "0.1.12", git = "https://github.com/HaoboGu/rmk" }
in your Cargo.toml to use it
Usage
A toml file named keyboard.toml is used as a configuration file. The following is the spec of toml:
[Here] is an example keyboard.toml for stm32 microcontroller, put your keyboard.toml at the root of your firmware project.
RMK provides a proc-macro to load the keyboard.toml: #[rmk_keyboard], add it to your main.rs like:
#![allow(unused)]
fn main() {
#[rmk_keyboard]
mod my_keyboard {}
}
And, that's it! #[rmk_keyboard] macro would load your keyboard.toml config and create everything that's needed for creating a RMK keyboard instance.
If you don't want any other customizations beyond the keyboard.toml, #[rmk_keyboard] macro will just work. For the full examples, please check the example/use_config folder.
What's in the config file?
The config file contains almost EVERYTHING that users could customize to build a keyboard. There are several sections in the config file:
[keyboard]
[keyboard] section contains basic information of the keyboard, such as keyboard's name, chip, etc:
[keyboard]
name = "RMK Keyboard"
vendor_id = 0x4c4b
product_id = 0x4643
manufacturer = "RMK"
chip = "stm32h7b0vb"
# If your chip doesn't have a functional USB peripheral, for example, nRF52832/esp32c3(esp32c3 has only USB serial, not full functional USB), set `usb_enable` to false
usb_enable = true
[matrix]
[matrix] section defines the key matrix information of the keyboard, like number of rows, cols and keymap layers, input/output pins.
IO pins are represented with an array of string, the string value should be the GPIO peripheral name of the chip. For example, if you're using stm32h750xb, you can go to https://docs.embassy.dev/embassy-stm32/git/stm32h750xb/peripherals/index.html to get the valid GPIO peripheral name:
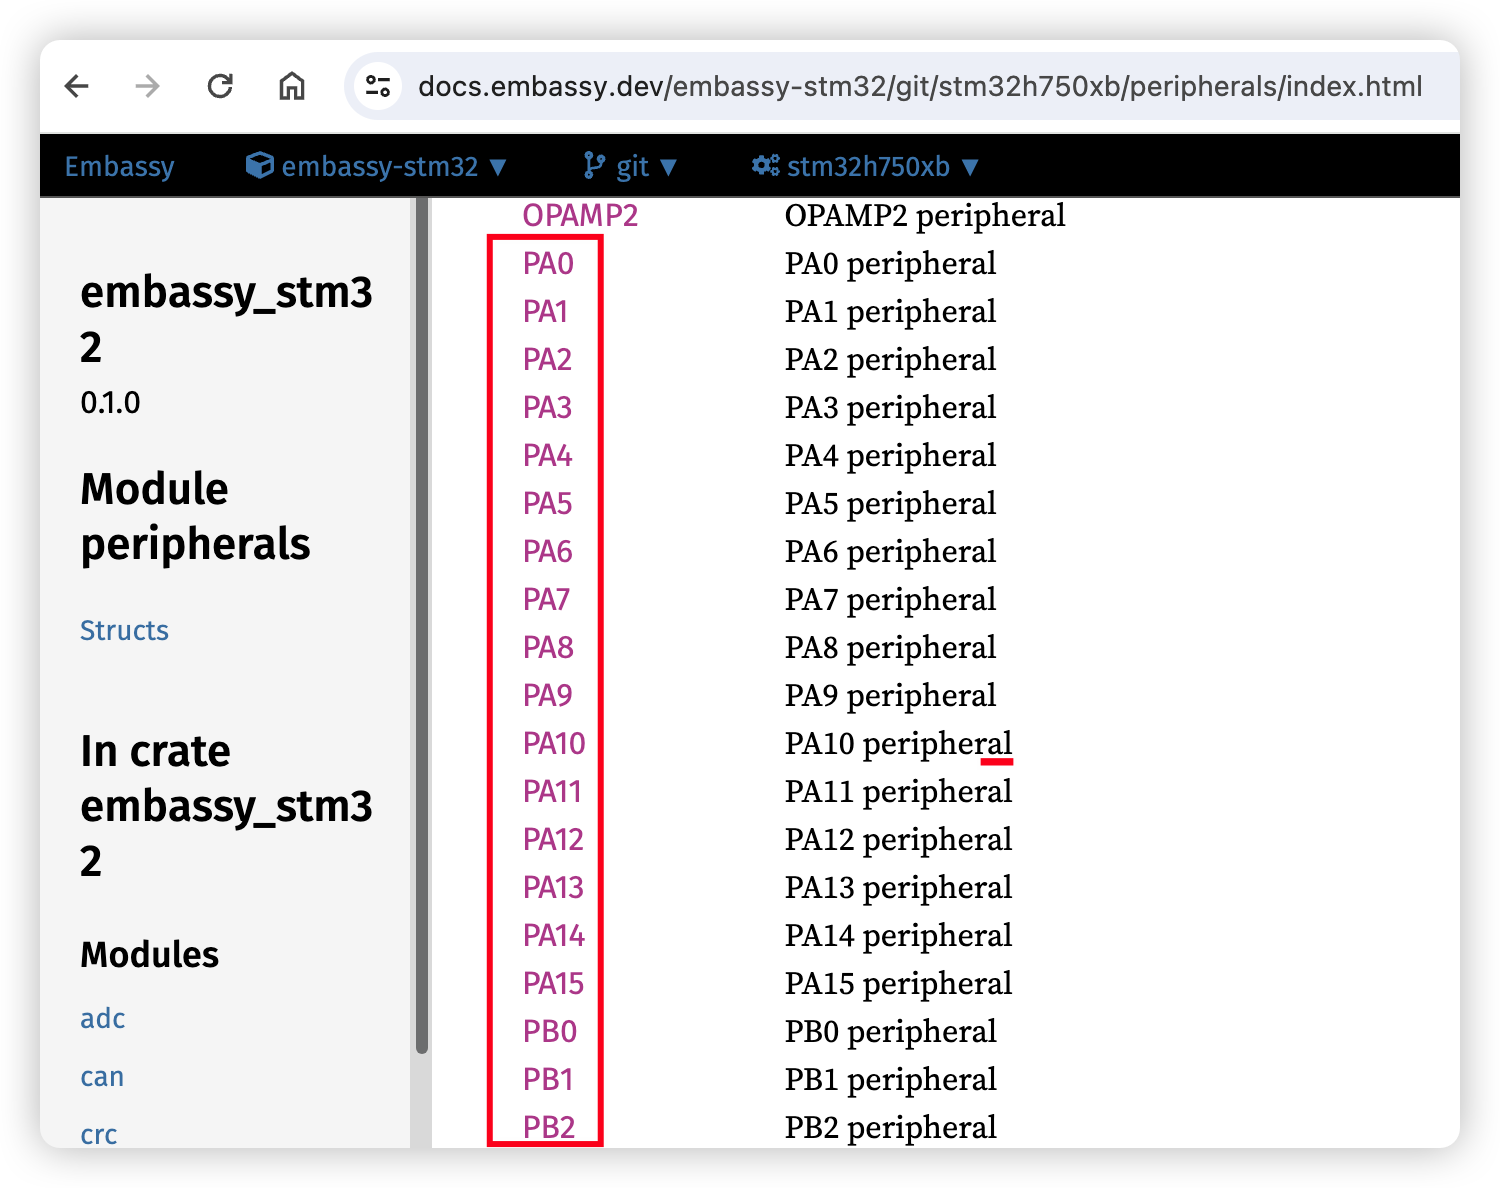
The GPIO peripheral name varies for different chips. For example, RP2040 has PIN_0, nRF52840 has P0_00 and stm32 has PA0. So it's recommended to check the embassy's doc for your chip to get the valid GPIO name first.
Here is an example toml of [matrix] section for stm32:
[matrix]
rows = 4
cols = 3
layers = 2
# Input and output pins are mandatory
input_pins = ["PD4", "PD5", "PD6", "PD3"]
output_pins = ["PD7", "PD8", "PD9"]
# WARNING: Currently row2col/col2row is set in RMK's feature gate, configs here do nothing actually
# row2col = true
[layout]
[layout] section contains the default keymap for the keyboard. It's currently not implemented, PRs welcome!
[light]
[light] section defines lights of the keyboard, aka capslock, scrolllock and numslock. They are actually an input pin, so there are two fields available: pin and low_active.
pin field is just like IO pins in [matrix], low_active defines whether the light low-active or high-active(true means low-active).
[light]
# All light pins are high-active by default, uncomment if you want it to be low-active
capslock.pin = "PA4"
# capslock.low_active = true
scrolllock.pin = "PA3"
# scrolllock.low_active = true
# Just ignore if no light pin is used for it
# numslock.pin = "PA5"
# numslock.low_active = true
[storage]
[storage] section defines storage related configs. Storage feature is required to persist keymap data, it's strongly recommended to make it enabled(and it's enabled by default!). RMK will automatically use the last two section of chip's internal flash as the pre-served storage space. If you don't want to change the default setting, just leave this section empty.
[storage]
# Storage feature is enabled by default
# enabled = false
# Start address of local storage, MUST BE start of a sector.
# If start_addr is set to 0(this is the default value), the last `num_sectors` sectors will be used.
# start_addr = 0x00000000
# How many sectors are used for storage, the default value is 2
# num_sectors = 2
[ble]
To enable BLE, add enabled = true under the [ble] section.
There are several more configs for reading battery level and charging state, now they are available for nRF52840 only.
[ble]
# Whether to enable BLE feature
enabled = true
# nRF52840's saadc pin for reading battery level
battery_pin = "PA0"
# Pin that reads battery's charging state, `low-active` means the battery is charging when `charge_state.pin` is low
charge_state.pin = "PA0"
charge_state.low_active = true
Keymap config(draft)
NOTE: THIS FEATURE IS NOT AVAILABLE NOW, USE keymap.rs BEFORE IT'S COMPLETED AND GOT MERGED TO MASTER.
Suggestions are welcomed!
You can set your keyboard's default keymap in keyboard.toml. The config key is default_keymap under [layout] section:
[layout]
default_keymap = [
  # Your default keymap here
]
The keymap inside is a 2-D array, which represents layer -> row -> key structure of your keymap:
[layout]
default_keymap = [
  # Layer 1
  [
    ["key1", "key2"], # Row 1
    ["key1", "key2"], # Row 2
    ...
  ],
  # Layer 2
  [
    [], # Row 1
    [], # Row 2
    ...
  ],
  ...
]
The number of layers/rows/cols should be identical with what's already in [matrix] section.
In each row, some keys are set. Due to the limitation of toml file, all keys are strings. RMK would parse the strings and fill them to actual keymap initializer, like what's in keymap.rs
The key string should follow several rules:
-
For a simple keycode(aka keys in RMK's
KeyCodeenum), just fill its name.For example, if you set a keycode
"Backspace", it will be turned toKeyCode::Backspace. So you have to ensure that the keycode string is valid, or RMK wouldn't compile! -
For no-key, use
"__" -
RMK supports many advanced layer operations:
- Use
"MO(n)"to create a layer activate action - Use
"LM(n, modifier)"to create layer activate with modifier action. The modifier can be likeLShift | RGui - Use
"LT(n, key)"to create a layer activate action or tap key(tap/hold) - Use
"OSL(n)"to create a one-shot layer action - Use
"TT(n)"to create a layer activate or tap toggle action - Use
"TG(n)"to create a layer toggle action
- Use
The definitions of those operations are same with QMK, you can found here
More customization
#[rmk_keyboard] macro also provides some flexibilities of customizing the keyboard's behavior. For example, the clock config:
#![allow(unused)]
fn main() {
#[rmk]
mod MyKeyboard {
  use embassy_stm32::Config;

  #[config]
  fn config() -> Config {
    let mut config = Config::default();
    {
        use embassy_stm32::rcc::*;
        config.rcc.hsi = Some(HSIPrescaler::DIV1);
        // ... other rcc configs below
    }
    config
  }
}
}
RMK should use the config from the user defined function to initialize the singleton of chip peripheral, for stm32, you can assume that it's initialized using let p = embassy_stm32::init(config);.
TODOs:
- gen keymap
- read vial.json and gen